Spring Equinox 108 Sun Salutations – Lesson in Discipline

Yep, you read that correctly, one-hundred-and-eight Sun Salutations. That was the number that a group of us in Busan, South Korea recently performed for the Spring Equinox to mark the arrival of spring. The number has significance, which I will not go into here, what I want to touch upon is the discipline required to perform such a feat.

It might be hard to grasp how big of a number that is in terms of performing a yoga sequence and in case you are not familiar with what a Sun Salutation is, let me first explain that. There are two primary, traditional Sun Salutations, known as Sun A and Sun B, or Surya Namaskara A and B in Sanskrit. They are routines of poses performed in a quick moving pace, one breath one movement. By their name, you may have guessed that they were traditionally performed in the morning at sunrise to salute the sun, giver of all energy. In western yoga classes they are still performed, but usually long after the hours of sunrise. If you’ve attended a yoga class, chances are are that you performed either, or both A and B as a warm up that begins the class. Typically a teacher guides students through 4-6 salutes as a warm up, and boy do they do the trick to warm up the muscles, so imagine how much heat is created performing 108!!

108

For this event there were six teachers who split the teaching. Each teacher had free reign as to which salute (A and/or B) and whatever modifications they wanted to add on. The first three teachers who taught added a lot of modifications to their sequences, which was a great workout and  a good mental practice. That first section was where the practice of discipline was really honed for me. Thoughts went through my mind such as,

“This is difficult, I wish I could take a rest, but no, keep enduring with everyone else!”

It truly helped to pump through the event with a group. We were all silently working towards the same goal.

You don’t have to be participating in a long event to struggle with endurance in yoga, in any yoga class or in your home practice, you might bump into big walls that try to push you down and defeat you. I have two views on how to react to those overbearing obstacles; first, succumb to the pressure and take a rest; second, kick up some dirt and plow through that bad boy.

To expand, during any physical activity it is good to be reminded and to remind yourself, that it is not necessary to overexert yourself. Not only is it not necessary, but it is generally not safe as injuries can arise. As a teacher, I remind my students to take child’s pose whenever they need to and I enjoy when I see students doing just that because I know that they’re listening to their bodies and giving themselves the rest that they need in the moment.
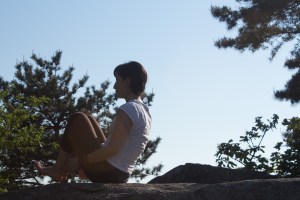
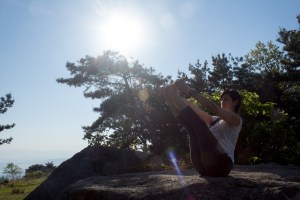
Saluting the sun.

Saluting the sun.

On the other hand, it’s also good to grit your teeth and go deeper.You have to ask yourself if you really need the break, or if you can push on and complete the pose or sequence (safely.) For if you always slumped into child’s pose instead of giving it one more go, you might never discover that you can accomplish a pose. Also, you wouldn’t be building the strength that comes with those trembling quads in your 42nd warrior pose of the afternoon.

After an intermission of moving entertainment by two fellow yogis, who perfored a stunning acro yoga sequence, we moved on to the last three teachers, I should mention that I was one of the teachers in the last set! At this event I was the final one to lead and for this reason, I switched my lesson plans up a little bit by removing all chaturungs to give achy wrists a break (did anyone just get Achy Breaky Heart in their head? If you didn’t, you do now!) Personally it wasn’t my wrists that needed the break as much as burning triceps! It was very rewarding as a teacher to be able to guide everyone through the final salutes and to give the cue of “Just three more.” and “Last one, you did it!” There were smiles and sighs at the completion of the event. And I’m sure we all learned a little something about ourselves in the push through those 108.


This event was organized by Kaizen yoga studio of Busan. It is the wonderfully talented and ambitios Mindy Sisco who has made the equinox and solstice events possible that I have been so fortunate to be a part of. Mindy and her business partner Simon have regular classes at their gym. Schedule and pricing can be found here.

Mindy and Simon of Kaizen.

Mindy and Simon of Kaizen.


Simon of Kaizen is credited with all photos of the Spring Equinox event used in this post.

“I’m bad at yoga” An Untruth of the Ego

Yoga is a practice of body and mind. By synching our breath with our movement, we bring ourselves into the present moment and forget about our worries or anxieties about the past or future, if only for an exhale. To be completely aware is something that needs to be developed and practiced, it does not come easily for most of us. In fact, our minds can often wander into a dark place- our ego.

This is a topic mentioned before in a previous post; it often happens that we got to a yoga class and instead of focusing our dristi (gaze of the eyes) where it should be, we let it roam around the room to our fellow classmates. In doing so, negative comparative thoughts can creep in such as, “Wow, she’s going so much deeper than I am.” or “I wish I wasn’t right next to this insanely flexible girl, I must look terrible.” A good thing to do if you find yourself thinking like that, is to take an audible exhale through the mouth, create a sound like a sigh, and as you do so, imagine that the exhale contains that negative thought and  through the sigh it has been expelled from you.

The ego doesn’t always put you down, sometimes it lifts you up. For example, you might hear the teacher give cues to come into a pose that is new to you, and wow! success! you can do this new and impressive looking pose. In that moment a smile should come to your face and you should feel proud and empowered by your practice. That’s a very healthy feeling to have. Yoga teachers want you to have that feeling in their classes, to explore your body and your limits and progress your practice, but a place that isn’t good to let your mind go to is to compare your practice with the other students in the class in a way that lifts yourself up above them. Don’t get cocky. Try your best not to compare for better or for worse, and if you do, use that breath as a tool to bring your mind into a neutral place focusing on the present again.

Another common happening in yoga is to compare yourself to yourself. You might find frustration when today’s bakasana (crow pose) is less steady than yesterday’s. Exhale it out and remember that your body will perform differently day-to-day depending on an array of factors such as the way you slept, stresses in your life that are causing you to lose focus, if you drank alcohol, etc. You will find differences in not only your balance day-to-day but also in your strength and flexibility.

Yoga is a skill like snowboarding.

Yoga is a skill like snowboarding.

My final thought (for today) on this is to remind you that yoga is a skill. I think that most people come to the conclusion that they have the same two legs and arms as everyone else in the room, so therefore they should be able to do the same things with their bodies. Yes, most of us have the same number of limbs, but they are not “the same.” Due to gender, natural flexibility, lifestyle, other areas of practice, all bodies are totally different. In terms of yoga as a skill, while teaching a class I likened yoga to snowboarding (or insert other individual-skill-based-sport,) you wouldn’t go snowboarding for your first time and feel down about the fact that other people at the resort were pulling tricks in the half-pipe and you could not. That would be an absurd thought to have, so why do people often think that way in yoga? Come to your mat again and again, and one day, maybe years away, you might drop into that half-pipe, but if you don’t, don’t worry about it, just enjoy where your practice is today.

To have thoughts like these are utterly normal while practicing yoga. I have had students come up to me and vocalize such thoughts by asking, “How were my poses today?” or “It’s been a while, so I’m bad.” and I reply to them by saying that there is no such thing and that their practice is perfect, for them, today. I’ll come out and admit that I still have these thoughts now and again, especially as a teacher, I sometimes think, “I should be able to do that- I’ve practiced long enough.” When my pesky mind goes into that dark corner, I smile, shake my head a little, and exhale it away.

Sustainably Fill Your Closet – 6 Tips

In my last post I outlined the many negative effects of the fashion industry and how learning of them altered my shopping habits. In the past I used to shop somewhat regularly. It wasn’t often a matter of desperately needing an item, instead it was just something to do in my down time. I would check out sales and feel really excited and happy when I found what I thought was a good deal. Sometimes I would even buy something without even having any need for it, and maybe not even liking it much, therefore it might have found its way to the back of the closet, and then much later, to the thrift store.

Now I give so much more consideration to my shopping, and here’s how.

  1. Just get by: If you saw me out and about and paid attention to what I was wearing, then you would notice that my clothes are on heavy rotation. I have a relatively small amount of clothing that gets worn again and again. Specific to me, being a kindergarten ESL teacher and a yoga teacher, I am able to get away with going very casual, for example jeans and a baggy sweater. You might not have this sort of lifestyle and may find yourself requiring more variety in your wardrobe, if that’s the case, then there are ways to obtain them sustainably.
  2. Second-hand shopping: There’s still a way to have a shopping hobby, but without supporting the fashion industry, and that is to shop second-hand. Of course, second-hand shopping is more like finding a needle in a haystack at times, but when you do find that needle it feels like it’s the shiniest needle in all of the world since it probably took some time and luck to come across it. Here in Korea there are second-hand shops in most neighborhoods. This is my favorite one- The Beautiful Store. Another option would be consignment stores, which are costlier but guarantee less digging.

    Items donated for my upcoming clothing swap.

    Items donated for my upcoming clothing swap.

  3. Swap clothes with friends (and strangers): It’s common to lose interest in things that were bought long ago or that were not quite right but got purchased anyway. Instead of tossing thes things in a landfill, host or attend a clothing swap. That way you can feel satisfied with a cleaned out closet and then quickly fill it up with some fun new things.
  4. Read labels: Imagine if people read clothing tags the same way that they read nutrition labels and avoided toxic fabrics as much as they avoid GMO foods. It’s become a new habit of mine to check out where things are made and what they’re made of. Shop around and choose the more sustainable option of what you’re buying. Recently I have done this when shopping for headphones and yoga pants and feel prouder of my things even if nobody knows that they’re a bit more sustainable. Choosing something that’s better for you and for the environment can give a small sense of pride.
  5. Shop locally: If possible buy items made in your area, or at least country. That’s not very common
    in the US anymore, but can be done, American Apparel comes to mind. You could also shop on Etsy for up-cycled clothes. Here in Korea it’s much easier to do, a lot of small shops sell Made in Korea.

    Merino wool, one of my favorites.

    Merino wool, one of my favorites.

  6. Buy Natural Materials: Choosing a wool knit over acrylic will definitely cost more, unless found at a thrift store, but you get what you pay for. Spending more on high quality will mean that it will actually feel nicer to the touch (and you will be wearing it on your skin,) it will look nicer, and last longer. Other natural materials to keep an eye out for are organic cottons, silk, hemp, leather and suede.

Conscious consumerism takes more time and effort, but after practice it will develop into unconscious-concious consumerism, if that makes any sense. You will begin to be more aware of the things that you bring home with you and where and how they came to be. It really is similar to watching the breath in yoga, at first it’s not easy to give the breath full attention, but after hours and years of practice, it just begins to be the new normal. Likewise, choosing to shop more sustainably can soon become your new normal, too.
A handmade poster made by yours truly for my first swap in which I gave a short talk about shopping habits.

A handmade poster made by yours truly for my first swap in which I gave a short talk about shopping habits.

Yoga off the Mat – A Mindful Closet

Yoga is much more than a physical practice. The mindfulness that is practiced during yoga starts to happen in day-to-day situations such as more healthful eating, calming the mind in times of stress, and even in the way we consume. A few years ago I became more aware of the fashion industry and have since then drastically changed my consuming habits.

We don’t often think that long about a purchase anymore. In terms of clothes, if it’s on sale, fits, and looks cute, then in the cart it goes. It could be useful at some point, right? But often times that $5.00 top gets tossed into an overcroweded closet never to be seen again. This is a common happening for a lot of (especially) women in our culture. Advertisements, Hollywood, and popular culture throw messages at us all over the place to buy more, more, more. But where are all of these clothes coming from? 

The line of production of a piece of clothing is a lot longer than we think. First, the fabric starts out as a raw material. Let’s look at that $5.00 top and assume that it’s a T-shirt. If it’s cotton then it would have started out as a seed. According to the research done by Planet Money of NPR, who followed a T-shirt throughout its entire life-cycle, 90% of all cotton seeds are GMO. Then there’s the resources needed to grow that little seed. A lot of water is needed for cotton and that water sprays off the pesticides and fertilizers that are used on the cotton, seeping into the water basin (buying organic cotton is an idea.) So already when we take a closer look at just the cotton that will eventually become a cheap T-shirt, there are quite a lot of negative effects. This is assuming that the T-shirt is 100% cotton, what if it was a blend, say made with 5% spandex to give it to some stretch. Spandex is a synthetic fabric made using more (chemical) resources in production. I attempted to do basic research into this and was scared off by all of the chemical jargon that I couldn’t even pronounce (macroglycol and diisocyanate to name just two.) Test your patience with this read.

After the cotton is harvested it gets shipped to another location, most likely in another country, to be turned into fabric. This process might include such steps as washing the cotton, spinning it into yarn, turning that yarn into fabric and dying it. The dyes are not often natural anymore and run into the local bodies of water. You can google images of rivers running all colors of the rainbow in manufacturing countries. Then the fabric gets cut and sewn into T-shirts. Most of this production no longer happens in the developed world. Thanks to globalization and outsourcing the job gets done by populations in poverty who will do it for much less.

Most clothing tags read: Vietnam, Turkey, China, or Bangladesh, just to name a few. In these countries the laborers can be paid much less and the working and environmental standards are much lower or non-existent. Chemicals and pollutants can be harmful to their health and do damage to the local environment, too. Again, according to the work done by Planet Money, some workers in Bangladesh work six days a week and make about $68/month. Here’s a link to a video series about the process made by the podcast.

Wages may be a low cost to the producers, but the long-term and often unthought-of cost of pollution and dangers to health is often overlooked. In April of 2013 there was a massive and devastating building collapse in a Bangladeshi factory. The multi-story building housed hundreds of employees put to work to produce clothing items for around 30 big names in the industry. The building was not well maintained which probably caused the collapse and took the lives of around 1,000 people. All working to produce cheap fashion for us in developed nations. When given thought, it makes that $5.00 T-shirt seem a little more expensive in terms of hidden costs- some even in human lives.

Possibly made in a similar factory as that which collapsed.

Possibly made in a similar factory as that which collapsed.

That tragic incident was the turning point for me. The event was framed by author Elizabeth Cline, in an interview on NPR’s Fresh Air. In the interview the author details the problems in the industry that she discovered through intense field research in countries like Bangladesh. 

After listening to the interview I began to realize that there was really no need for me to shop as much anymore. My closet had been full, and bursting, for most of my adult life. Shopping to me was a hobby, a way to spend an afternoon. Yes, I got that rush when I scored a great deal and even bragged about it to my sister, but that little rush and hobby had to be altered out of respect for the negative effects it had in other parts of the world. And really it wasn’t that hard to do.

Escaping from the pull towards trends and fast fashion may not be easy at first, it requires a change of behavior as well as the mindset to be happy with what you have. There are certainly days when I see something in an ad and think to myself, how cute and nice it looks and wouldn’t it be great to have? But I quickly find my way back to the core thought that, on second thought- No, I don’t NEED it, I can happily do without.

Best of luck to you on this journey of lifestyle change for the better. More blog posts in the future on specific tips and experiences.

Don’t Shop, Swap!

Clothing swaps are great alternatives to shopping, and make for excuses to have a social gathering with old friends or new. They’re very easy to put together and require very little planning. Plus, everyone will hopefully go home with something new (to them) and exciting!

I first attended a clothing swap with my boyfriend’s mom where she lives in the south of France. On a fall afternoon a large group of women gathered in a friend’s home and laid out items that no longer got much use from them, to be shared and swapped with all in attendance. It was a lot of fun and a few years later I found myself hosting a swap in my expat community of Busan, South Korea. Here’s a quick how-to on hosting a clothing swap. Details are specific to an expat community, but a swap can be held anywhere.

Browsing items :)

Browsing items 🙂

  • Invites: Social media makes planning a breeze, with a few clicks and a nice photo you’re done! For my events I made the events public, open all in the community. For your friends you could make it more intimate by inviting them by phone or even send out some nice stationary, but doing things electronically saves paper and time.
  • Choose a Time: I have had a lot of success hosting swaps when the seasons are changing. People tend to pack up their shorts and tanks and pull out the sweaters in the fall, so that’s a great time to host an event, likewise spring is another great time. I encourage people to bring summer and winter clothes as people might be vacationing to warmer places, or can store the items for later.
  • Inform Your Guests:  Some people may not know what a clothing swap is, so let them know that it’s a chance to hand in unwanted clothes for others’ lightly used items. You can have your event be for ladies only, or extend it out to men or even make it a family event for children as well, as I’m sure a lot of families may have clothes that are getting too small and equally would be in need for someone else’s larger sizes! Be sure to plan the event a few weeks in the future to give people time to go through their closets. Decide if you want to include accessories and footwear and let everyone know. Be sure to tell guests that only lightly used items are appreciated.
  • People at Table Talk English Cafe, swapping away!Chose a Venue: As a very casual event you could host a swap in your living room, or on the porch in warmer months. You could make it more fun by incorporating a potluck. For a more public event, seek out a local cafe and encourage your guests to support the cafe by purchasing a drink or food. The chosen location might not even charge you rent if you let them know guests will be buying their fare.
  • Arrange Drop Off Times: Expat communities see people come and go routinely. Plan your swap to coincide with the waves of expats coming in and out. For example, here in Korea the school year begins in March, so people leave in February and newbies arrive in March- a great time to host a swap. In order to collect off of the people who are flying out, ask the cafe if you can collect a few weeks early and store there, if that’s not an option, consider storing and collecting at your place.
  • Donate the Extras: Storing all of the left overs might not be reasonable, so search your local area for a charity shop, orphanage, or women’s shelter to take the clothes that remain. Call ahead to make sure that they’ll accept what you’ll have to bring.

Hosting a swap does not require much at all and can be such a fun event. For my first swap, I held a talk at the beginning for those interested about the sustainable aspect of the swap, which might be a good idea if you want to give your event a deeper meaning.

Here is the Facebook Event link to my upcoming Swap in Busan on March 14th. The swap is open to the public. As the host I encourage anyone to come have a look through the clothes, whether you have anything to contribute or not. The reason for this is that by taking an item off of someone rather than buying it new in the shop, you save the item from the landfill and also don’t contribute to mass consumption… but that’s a whole other blog post!


Update, here a few photos from the Swap that was held in Busan on the 14th of March. It was a success I believe, with people walking away with mounds of clothes. I learned from this event and am hopeful that next season’s will be even more successful and run more smoothly. This past event I happened to become ill during the swap and was running a fever for most of it, thankfully some good friends stepped in and helped me out so much. Thanks ladies!

Hosting Karma Yoga Classes

A karma yoga class is a class in which the payments are donated to a charity. As a teacher, they are very easy to  host and you do your part by donating the money, but also by teaching others about a charity or non-profit that has a lot of meaning to you (not to mention by giving everyone a well deserved yoga class!) Donations Only classes can be taught regularly or during special holidays or vacation times.I find that hosting karma yoga classes during holidays gives them just a little extra meaning; for example, I recently taught a class on Valentines Day, a great day to spread some love around. Here are some tips in hosting a karma yoga class.


Venue: 
Holding a donation based class outside at the beach or at a park is great, Beach Yogabecause no money gets lost to rent payments. When I first moved to Busan I hosted early morning beach yoga classes on the boardwalk and gave payments to my local non-profit of choice. Not much was raised, because not too many people are early risers, but every little bit counts!

Cost: Choose a minimum donation cost that is required, $5.00 is a good place to starDonationst. When I create my events I describe the cost as Minimum Donation of xxx, this way people might consider donating more. When class is finished and everyone is making their payments, I remind them that I have change for them if they need it, but if not their extra money is greatly appreciated by the organization. Many students will be generous.

Choose an Organization: Find a cause that means a lot to you personally and that you are knowledgeable enough about to tell others about in detail. At the beginning of the class, explain your organization of choice, where and how the money will be used, and other ways that people can help. Below is a description of the non-profit that I have been donating to.

BAPS- Busan Abandoned Pet Sanctuary

Busan Abandoned Pet Sanctuary is a privately run dog shelter in Busan, South Korea. The dedicated couple that run the shelter have rescued, medicated, and rehomed hundreds of dogs since 2008. Dogs have been saved from off the street and from the local pound; these are dogs that would have otherwise not had much of a chance at survival. BAPS is a no-kill shelter, so dogs are cared for until they are hopefully adopted for life. Money from donations goes to dog food, shelter upkeep, medications, male neutering, operations, etc.

My personal attachment to this non-profit is my love and joy, Fred, who I adopted from BAPS in 2011 with my boyfriend. He’s come a long way from his skin-diseased-street-dog-days and now lives a life of comfort, spending most of his days sleeping, curled up on my bed. He also loves to join me at beach yoga class. He takes a nice little nap in the sun while others flow.

To learn more about BAPS, visit their website or search for them on Facebook. Donations can be made within Korea by bank transfer or internationally by using Paypal. Information on how to donate is easily found on their website. There are even weekly dog walking volunteer events if you’re missing your furry loved one from back home, those can be found via Facebook.

DIY Natural Dying

I learned about using compost to make natural dyes via a podcast that my boyfriend was listening to one night, and it caught my attention. On the podcast, the woman was talking about collecting onion skins from restaurants to turn them into dye and I thought, well we go through a lot of onions, so might as well start collecting. I also asked some girlfriends to save their onion skins for me and had quite a collection. This past weekend I finally put the skins to use and the results were surprisingly nice. They will be sewn into eye pillows and cases.

How To

The Collection: I’m not sure on an amount, but if I had to guess I’d say that I used about 20 onions worth of skins. Initially I froze the skins, but I found that that’s not necessary. The skins keep well at room temperature as long as none of the flesh is on them. It’s winter now, so that might not be the case during the humid summer.

The Process: I followed this blog. Outlined below are the stepsSoaking the skins I took to dye my fabric.

  1. After collecting and storing the skins until I was ready to dye, the first step I took was to soak the onion skins. I covered the skins in water until they were all covered, but of course some were not submerged because they floated to the top. I had read that soaking over night gets the best results, so that’s what I did.
  2. The next day I boiled the skins in the water. They didn’t remain
    boiling for long. After they reached boiling, I lowered the heat to simmer. They simmered for about an hour. When I went to turn off the gas completely, I noticed that a lot of the water had boiled off and the water was colored an orange-brown. I removed the skins as much as I could.
  3. The next step is soaking the fabric in thedye. Using different types of metal creates different colors, so I used two different pots and experimented a bit. One piece of fabric was completely submerged in a cheap camping pot (I’m not sure what type of metal it is, but it’s cheap) while the other fabrics I played around with and explain how below. For the best results the blog said to soak the fabric in thedye while it is heated on the stove for about an hour.
    1. Two fabrics I tie-dyed. The first fabric I planned to use for eye pillows. The second was a shirt that I altered when I first bought my sewing machine (it has very rough hems from learning how to sew!)
    2. The other effect I daydreamed about making was an ombre effect, or fading from dark to light. I theorized that if I strategically hung the fabric above the dye only submerging the end and then lowered more into the dye every hour, then I’d end up with the part that was soaking the longest would be darker in color and that which was soaked for the least amount of time would be lighter in color. The end of the fabric wasn’t submerged at all and stayed the original cream color (minus some staining from the steam of the dye.
  1. After the fabrics were in the heated dye, I turned off the heat and let them cool in as they were. For better results it was recommended to have them sit in the dye overnight which is what I did. The following day (3 days into the process now) I took them out of the dye and rinsed them in cold water until they stopped running.

The results of this process came out great, I thought. I hope to play around with other natural dyes in the future. A student recommended dying with turmeric and fruit skins. Have you had any success with natural dyes?

Flow N Glow Event

This is a fun, laid back, and unique yoga event to both host and attend. I’ve had opportunities to co-host two previous events with another local teacher, both of which were well attended with students saying they had a good time. Recently I hosted a Flow N Glow, but this time solo as the other teacher was out of town on vacation. It’s a great event to hold in the cold months when not much else tends to go on.

Listed below are the vitals to hosting a successful Flow N Glow.

  1. The Studio– In order to get everyone shining their brightest, you’ll need backlights, the more the merrier. The space will have to be totally dark minus the backlights, so a space with not many windows is ideal. If there are windows, be sure to hold the event a while after the sun has set or block out the windows with some sort of opaque covering (bed sheet, cardboard, anything.)
  2. Things That Glow– UV Paint, glow in the dark stickers, and glow bracelets are what we’ve used. For my past event I chose not to provide glow sticks in order to reduce waste, but I didn’t discourage people from bringing their own. UV paint glows really well and is so much fun to apply. When planning be sure to give attendees at least 30 minutes to create their designs. Encourage everyone to wear white or neon clothes.
  3. Pumpin’ Playlist– Music is key for a dance inspired event. I took a lot of time to find out what songs are trending lately. If you go out, take note of what’s being played frequently. Be sure to include a range of styles to please a crowd. I included funk, pop, electronic, etc.
  4. Cleaning Supplies– The paint will come off throughout the night, especially if you get sweaty or spend time on the mat (on the belly or back.) Be respectful to the studio and be sure to clean up thoroughly afterwards. I provided my own home-made non-toxic cleaning spray.

And that’s how you host a Flow N Glow. One last, very important thing, be sure to advise students that not much alignment cueing will be given due to the loud music (and the lack of visibility for you as a teacher.) As always, it’s up to the practitioner themselves to keep their body safe. Encourage everyone to take child’s pose whenever, and as much as needed, and to only go as deep into a pose as they still feel comfortable in, and where they can maintain elongated breath. Glow on!

Photos by Nina- http://www.ninasn.com/

The Humble Tumbler

I’m assuming that tumbler is not just a Konglish word used over here in South Korea, but is also a term used in the wider world, but just in case that that isn’t the case, I’d better clarify. A tumbler is a mobile, reusable, totally sealed thermos for your coffee or tea. I was gifted mine back in 2010 and it still makes the daily rounds with me pretty much wherever I go. I prefer it to a water bottle because it holds both hot and cold, and it insulates. So my ice water on the beach in July is nice and chilly and my green tea in December fogs up my glasses on the subway. Here is some more info on this wonderfully useful device.

The fact that it has a vaccuum seal lid raises it far above it’s cousin the travel mug, and this is because it can be tossed in any bag and carted along without getting your precious belongings splattered or drenched in a sticky chai tea latte. Recently in the past year I have been biking to and from lessons more often than I used to, and I have had absolutely no hesitation throwing my full tumbler in my backpack. I can’t say that this would be the case if I had a lesser quality tumbler, so if you’re looking to purchase maybe read reviews.

It’s also cost efficient. If I compare the cost of a tumbler, which is about $20-$30, to buying a plastic bottle of water at a convenience store at about $1, it would of course take only 20-30 times to equal the cost of the tumbler. That’s only about one month of yoga classes, so in one month my tumbler has earned her keep. That time frame is decreased if I get a to-go coffee at a chain, as they usually give a discount if you ask them to put the coffee in your tumbler.

A minuscule sample (I didn't see anyone else drinking out of a mug or reusable tumbler besides myself in this busy cafe) of single use paper and plastic containers. A drink of choice was purchased and poured in, then said drink was drunk, and then they were tossed.

A minuscule sample (I didn’t see anyone else drinking out of a mug or reusable tumbler besides myself in this busy cafe) of single use paper and plastic containers. A drink of choice was purchased and poured in, then said drink was drunk, and then they were tossed.

Another reason why I prefer using a metal tumbler to using plastic water bottles is of course sustainability. I’m trying more and more to cut back on using single use, disposable items (think plastic forks, water bottles, straws, etc.) with the hopes of one day quitting use totally. Litter is an unfortunate, daily problem here in South Korea. I’m not going to try to explain this problem here, because I don’t want to judge the culture of the country that I have been calling my home for 3+ years, but I will say that I don’t condone the littering. Cafe culture is HUGE here, I live one block from a main tourist beach in Busan and there are innumerable cafes (ok, realistically about 50ish on a 1.4km/.87mi long beach) and the majority of patrons of those cafes get single use to-go cups. Employees don’t even ask preferrence, they just give the to go cup, plastic or paper, regardless of whether you’re about to stroll the beach or sit down and study for an hour. That’s a lot of waste each and every day; waste that is usually just littered on the beach or street since the city doesn’t provide many waste receptacles. There are recycling areas sporadically on the beach, but the cups and other waste items don’t always make it there.

streetlitter

Fred disapproving of litter outside of our apartment building. There are at least five single use containers for hot liquid here. The coffee would have been drunk in minutes and then littered.

And if the cups do make their way to the recycle bins then all is fine and well, right? Well not totally, ok yes, they can be recycled, but recycling uses a lot of energy, so it’s better to reuse. That plastic bottle has to be taken to a processing plant (shipping fuel,) where it is sorted, cleaned (water/energy waste,) processed into pellets (more energy waste,) and then the pellets start their journey to be turned into more plastic bottles or plastic bags. But imagine if we just stopped using those plastic bottles/bags, then there’d be no demand for them. Instead we could use metal tumblers and cotton reusable bags. In the description I use the word waste purposefully because if we change our perception of plastic use to waste, then maybe we’ll stop using (wasting!!!) so much plastic.

The final reason why I’m antiplastic bottle is the negative effects of leaking chemicals into the food or drink that we consume, especially with a heated food or liquid. The research has been out on BPA (bisphenol A) for a while. I’ve heard and read some pretty scary stuff about the chemical which is used to make plastics more durable. You can read up on the stuff yourself here, and at breastcancer.org, and with this PDF, and lastly if you’re more of an auditory learner then this is a very informative interview with a scientist who wrote a book about testing her own breast milk for toxins.

DIY Yoga Eye Pillow

A yoga prop that I love to utilize in Savasana (corpse pose) is an eye pillow. I started to use one regularly years ago after being introduced to them at a yoga studio. What an eye pillow is, is what it sounds like; a tiny little pillow to rest on top of your eyes. Usually they are made of a soft fabric like silk or cotton that feels comfortable on your face. The filling is made up of flax seeds coated in an essential oil- lavender being my favorite. Not only does the soft scent of the lavender calm you as you inhale in your Savasana, but the flax seeds make it impossible not to close the eyes and also block out any light in the environment.

Unfortunately, I lost my eye pillow months back while travelling and never replaced it. Instead I had a goal to teach myself how to make them and it turned out to be much easier than I might have imagined. I acquired a sewing machine, found a tutorial online, and cut apart an old pillow case to upcycle* into the eye pillow, and while I was at it I created half a dozen for the students of my classes to use. These lovelies were a long time in the making and even include hand-picked, dried lavender kindly sent from England, upon request, from my boyfriends mother.

IMG_4689IMG_4663IMG_4693

The How To

What You’ll Need:

  • Sewing Machine
  • Cotton or silk upcycled fabric
  • Flax Seeds 1-1 ½ C
  • Lavender (to relax) or Mint (to revitalize) essential oil
  • Measuring cup
  • Funnel
  1. Cut your fabric to 25x25cm.
  2. Fold the fabric inside out (print on the inside) in half and sew to close two sides leaving an opening to fill the pillow.
  3. Scent the flax seeds to as strong as you like (careful not too much, I once re-scented mine more than I should have and the lavender oil burned my eyes!)
  4. Turn the pillow right side out. Fill the pillow with about 1 ½ C of the scented flax seeds depending on how dense you want your pillow.
  5. Sew the opening to close the pillow.

Follow this link to a blog where I found these directions as well as easy to follow directions to make the pillow cases.

*A note on upcyclying and why it’s great; this is when you give new life to an old, no longer used, soon to be discarded object. As this is a blog dedicated to both yoga and sustainability, I am glad to write this post about creating (DIY) rather than consuming with the added benefit of keeping some pillow cases out of a landfill.