Intro to Raja Yoga – BK Meditation Center – Luzon, Philippines

I found the Brahma Kumaris Meditation Center in early December of last year. I was in the middle of a solo trip around Luzon, the biggest island in the Philippines, and after a week or so of hiking volcanos and wandering museums, I felt the need to stay put in the city of Baguio for a couple days, dig a little deeper, and figure out my next steps.

The Baguio center had a five-star review on TripAdvisor, but with only three reviewers, I wasn’t totally sure what to expect on my visit, other than the peaceful experience and beautiful views that had been written about. I liked going into it this way, without knowing too much.

photo 2

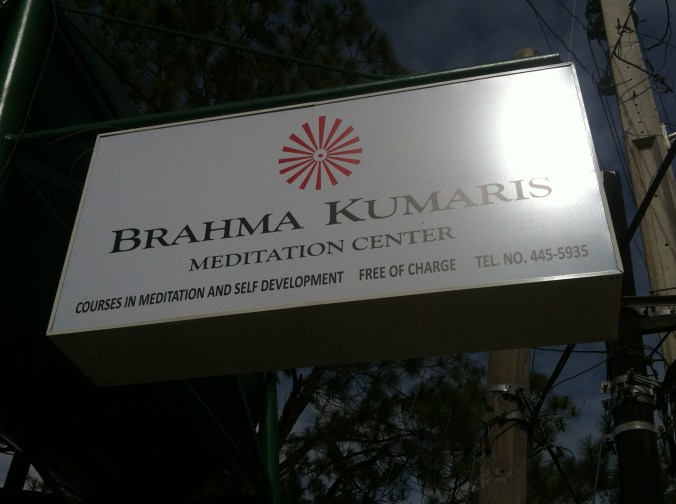
The grounds of Baguio’s Brahma Kumaris Meditation Center

Before my visit, I wasn’t sure what kind of vibe the center would have or even what kind of meditation classes were offered, but I was crossing my fingers that I’d at least meet people there who could point me in the direction of some Baguio yoga classes.

Up until then, I’d assumed anything called “yoga” had to do with the joining of movement and breath. The Brahma Kumaris Center was my first encounter with a different kind of practice – the practice of raja yoga.

I showed up on a Sunday afternoon, at the end of a weekend gathering of Filipino Brahma Kumaris practitioners. The Baguio center is a gorgeous, small green space with one of the best views of the city, near the top of a hill overlooking valleys, homes, and farms.

I was warmly welcomed there by everyone I met. When it became clear that I wasn’t going to find the kind of yoga I was looking for, I scheduled a Brahma Kumaris introductory class with Sister Salud, a self-described “content spirit,” for early the following Wednesday morning.

Lesson 1

The first lesson offered a detailed background of Brahma Kumaris, or BK, a worldwide learning community that practices raja yoga meditation. Literally translated, raja means king, ruler, or highest. Yoga is a union, link, or connection. Raja yoga was described to me as making a connection to a higher power.

Some takeaways from the first class:

  • Practice self-love. We should try to achieve self-love through understanding and appreciation of the self and by doing the best we can to make ourselves happy.
  • Create a link to our inner selves, and work to maintain the following:
    • self-respect – knowing that we are intrinsically good
    • self-esteem – valuing our own uniqueness
    • self-confidence – contributing to the betterment of the world by bringing benefit to ourselves and others
    • self-sovereignty – ruling our kingdoms by being independent and making our lives and ourselves worthy.
  • Meditation is a tool. Use it to discover the self – to contemplate, reflect, and focus on one thing. Still the mind, and actively create a thought to focus on.
  • Take what we want. Relegate old knowledge to the side, and go into new knowledge. There’s a lot to discover. Come to our own realizations and find our own truth. Once we find the truth, experience it and take what’s beneficial.
  • Feed the mind with goodness. Focus on positivity and healing during meditation. Take the dirty, muddy water of our negative selves and run clear, pure water over it until it’s clean.

We ended with a guided meditation, which was the raja yoga practice, and set a time to meet for the next session.

Lesson 2

The second class focused on the soul-body connection and discovering who we are spiritually. Sister Salud said the commonality of every human being is the soul – a living energy of light – within the body. We discussed the location of the soul, what some might call the third eye.

Some takeaways from the second class:

  • The soul gives life to the whole body. The soul is like the driver of the body, which is the vehicle. The body is for expression and experience.
  • Be soul-conscious. We should find a direction and a purpose for what we’re doing. Put the energy of our soul there and focus on the qualities of the soul. This is our energy. It’s intrinsic.
  • Seek peace from within. If we’re aware of our soul energy, we can get support from within. Choose peace, and direct our minds to be peaceful.
  • Drive energy into positive qualities. Remain aware of the type of soul we want to be, and manifest it.

So, how do we manifest a positive living energy of light? According to Sister Salud, that’s the question to be answered through raja yoga.

Again, we ended the class with a guided meditation. My time in Baguio was coming to a close, so she pointed me in the direction of other BK centers along my travel route. While I haven’t taken the time to attend a third session, I’m so thankful for my experience learning about the practice of raja yoga, and I’ve started to incorporate some of the ideas into my meditation practice.

Directions by cab:

Tell the driver to go to Dominican Hill. Once you get a bit out of the city and start heading up the hill, you’ll pass Lourdes Grotto. Keep going up the hill but not quite to the top. You’ll see the sign for the Brahma Kumaris Meditation Center on the right, as you approach the top.

photo 3

It may be difficult to catch a cab back, but start walking down the hill, and you’ll probably get lucky with a cab, tricycle, or jeepney around the bottom of the stairs at Lourdes Grotto.

Brahma Kumaris has over 8,000 centers across 130 countries, and it’s been around for 78 years. Its brochure explains: “Through meditation, we seek to help people rediscover their goodness and develop their spiritual awareness, attitude, and behavior.” For more information, visit BK on the web at www.brahmakumaris.org.

My Flying Yoga Experience

Flying yoga (also known as anti-gravity yoga/aerial yoga) is a trendy style of yoga that until recently I had never attempted. Luckily though, while on vacation in the Philippines, I learned of a class happening at the Yoga Barn Panglao and excitedly signed up.

Fellow karabemisyoga blogger, Amy Steele, came along for the class and it ended up being just the two of us in the morning Flying Yoga class that as of then was not yet added to their regular class schedule. Our teacher that morning was Alex Kuznetsov from Russia. Alex was patient and attentive as a teacher and demoed the entire class so that we could follow along. He then adjusted if needed.

20151229_112859.jpg

Teacher Alex stopping my falling angel from falling so much!

Here are my observations of my first flying yoga class:

  • It’s difficult – I went into the class not really knowing what to expect, but the second we started using the hammock for our warm up sun salutes I felt the burn. Having an extremity, or limb, lifted off of the ground means using your core to balance and keep from falling over. The hammock also offered some resistance that doesn’t usually come with basic standing poses. I found that my muscles were shaking like jelly in poses that are usually very comfortable for me, like Virabhadrasana 2.
  • It’s a prop – The hammock used in flying yoga is essentially a prop that switches up your regular yoga practice. At times the pressure of the hammock felt uncomfrtable against skin and bone, but Alex reassured us that that feeling was normal and would begin to fade away with more practice. I noticed as well that the hammock applied extra pressure that sometimes felt beneficial, such as in Vrksasana. I felt a strong pressure on the sole of my standing foot that felt similar to reflexology.
20151229_112830.jpg

(Uprooted) Vrksasana

  • It encourages engagement – The core is engaged for balance and deeper, more intrinsic muscles tighten up while pulling the legs together to stay upright. For example, in high lunge where the front knee is bent over the hammock, engaging my muscles a lot was necessary so that I could keep the form.
  • It’s beautiful – Although I struggled to get into certain poses, once in them, I did truly feel like I was “flying.” Doing Badha Konasana, or any other pose, while floating two feet above the ground is invigorating. Of course there are plenty of opportunities to snap some instagram worthy pics.
20151229_113035.jpg

Amy and Teacher Alex in Badha Konasana.

  • Relax in that hammock – It’s called a hammock because it’s a hammock, and we all know that hammocks beckon us over to have a doze. At the end of our class Alex guided us in relaxing, longer-held poses. The heat of the island and the sounds of nature could have easily lulled me to sleep in my big blue hammock, but I refrained from slumber.
20151229_113141.jpg

Seated variation of Badha Konasana with tropical palm tree view.


Flying yoga is a fun supplement to a regular yoga practice. There are many benefits to this style of yoga and at the very least it will reinvigorate standard poses that may have lost their luster from years of practice.


Go to Yoga Barn Panglao’s website or their Facebook page to keep your eyes out for future Flying Yoga classes with Alex Kuznetsov.

20151229_113545.jpg

Top 4 Yoga Study Tips

So much more than being a yoga teacher, I am a yoga student. There is so much to learn about yoga, and you don’t have to be a yoga teacher to delve in. There are thousands of years of yogic history, philosophy and knowledge that cannot all be learned in any YTTC.

As a teacher, I strive to learn more and more about the human body and it’s movements and interweaving, working systems. This means studying human anatomy. Muscles, bones, and the like.

On top of the physical aspect of yoga there is a whole new language to learn – Sanskrit.

The list could go on, so to aid your study of yoga, here are four of my top yoga resources that I use to increase my understanding of yoga.

  • TIP ONE – ANATOMY COLORING BOOK – My trainer, Kimberly Waugh of Radiant Life Yoga School, had recommended that I get a coloring anatomy book during my YTTC exit interview back in 2013 when I asked her for advice on how to self-study anatomy. I don’t know why I didn’t take her advice right away, instead I only just recently purchased my coloring book and instantly fell in love. It’s stress reducing and educational at the same time! Grab your own and get to coloring… just one tip – get the big box of coloring pencils, minimum 24 pack.
img_20151007_190442.jpg

Netter’s Anatomy Coloring Book, 2nd Ed

  • TIP TWO – LEARN THROUGH YOUR EARS – I. Love. Podcasts. Many of my conversations begin like this, “I was listening to this podcast about (fill in the blank) and …” I subscribe to an array of them and am open to expanding my list. My favorite all time yoga podcast though is Yoga Body – The Yoga Talk Show by Lucas Rockwood. Episodes include interesting interviewees not only from the yoga world but from all areas of the health and wellness industries. Every show also includes a questions and answers segment with Lucas and a Nutritional Tip of the Week. Get this app.

ybn2


  • TIP THREE – FLASH CARDS – Be traditional and make your own, or try this flash cards app: AnkiApp. This app is new to me but I’ve already studied with it quite a lot. You search topics, choose a deck you like, download it to your app and start flipping. They even have flash cards specific to yoga.
screenshot_2015-12-20-13-40-43.png

AnkiApp, English/Sanskrit Pose Names

  • TIP FOUR – CREATE A STUDY GROUP – Ask fellow yoga students and/or teachers to study with you. Share resources and help commit each other to study dates and times. Claim a large table at a cafe, spread it all, sip some herbal tea and study.

img_20151121_125110.jpg

Changing your perspective of yoga from just a practice to a study of yoga will deepen your experience. Once you open that portal you’ll realize that there’s so much to learn and with that learning your practice will evolve.


*If your studying is taking you to a retreat or teacher training, then check out one of my first blog posts full of how to start the process of choosing the right YTTC for you.

Hygge Yoga

Hygge (hooga) is popping up everywhere this winter season, but if you’re looking at that mashup of consonants with a furrowed brow let me explain it a bit. The word is Danish and expresses an idea of warm & cozy during the winter months. Take a moment, close your eyes, and think of what makes you feel warm & cozy on a dark, cold winter night. Candles? Christmas lights? Hot chocolate? Reading in sweatpants under a blanket? That’s hygge.

As someone who generally dislikes winter and would much rather be on a hot beach than on the slopes I received the idea of hygge with big open arms. I’m comfortable self diagnosing that I suffer slightly from SAD – seasonally affective disorder, or in my case – being grumpy and mopey in the winter.  So when I recently learned of the idea of hygge, I embraced it completely and began to prominently incorporate it into my yoga classes.

Here’s how to have a fantastically hygge yoga:

  • small talk – It can be common to go to a yoga class as a student and not speak with anyone the majority of the time that you’re there. A major part of warding off the winter blues is to create a sense of community, so make an effort to talk with some fellow students or the teacher. Learn people’s names and small talk for a while. Chances are you’ll be seeing the same people at the next class, so there’s potential for building a friendship. If you primarily have a home practice, invite a friend over to practice with you and have some tea afterwards.
  • blanket bundle – Starting class seated cross-legged or in Sukasana is the general way I do things. From here I chat with students, give my intention, and bring them into their breath. To have a hygge experience, suggest to students that they wrap a blanket around their shoulders. Dim the lights or have only soft lighting on for an added touch.
  • vinyasa flow – Yin or restorative yoga might come to mind when thinking about a winter yoga class, and they have their own place, but to feel heated and warm from the inside out, it’s important to flow. Warming up and continuing to vinyasa flow will keep your muscles warm and open and allow you to go to your deepest edge in your practice. The body heat of the class will warm the room up and have everyone feeling hygge in no time.

Flow

  • slow it down – During the cool down of your practice light candles or dim the lights. If you like to practice with music, make sure that your playlist includes some mellow, sleepier tunes to put on during cool down and Savasana. Be careful if practicing alone, opt for Christmas lights over a candle if there’s a chance you might accidentally fall asleep.

If in Busan, come to my yoga classes to delight in the experience of hygge yoga! Class information can be found in the events section of the Busan Yoga & Meditation page.

Yoga Warm Up for Bouldering & Climbing

Bouldering is a challenging activity. It requires openness, strength, and concentration. Bouldering differs from climbing in that no ropes or harnesses are required, and because of that climbers often do more horizontal than vertical courses (uh-hem, especially if they have a fear of heights.) Yoga is a perfect complement to bouldering and climbing as it opens the joints, stretches out the muscles, builds strength, and calms the mind.

Here are some yoga poses to incorporate into your next bouldering or climbing session.

Warm Up Simple Sun Salutations will get those hamstrings and glutes warm. If you’re not familiar with Sun Salutations then do your own little warm up, if you’re ready to get on the wall quickly, then be mindful not to go beyond your limit in these warm up stretches.

SHOULDERS You want to be sure to warm up your shoulders before a shoulder intense activity like bouldering, this is especially true if you have tight or previously injured shoulders (I’m looking at you, dislocators!) While doing Sun Salutes, focus on drawing your shoulder blades down and in towards each other as you raise your hands overhead. Here are more shoulder openers:

  • Down Dog at the Wall With feet hip-distance and a slight bend in your knees, raise your arms overhead and place the palms flat on the wall. As you exhale, sit back like your going to sit into a chair, but don’t go so far that your hands come off the wall – keep contact. Go until your hamstrings say to stop and focus on pulling your shoulder blades down and in towards the middle of the back. Hold and breathe for five breaths or longer before inhaling up.
Downdog at the wall

Downdog at the wall

  • Garudasana/Eagle Arms  Start with the arms, bring them to a T, palms facing down. Exhale and cross the right arm over left. Bend at the elbows and touch either back of the hands or wrap until the palms touch. Hold and breathe deeply, release on an inhale and switch the arm that was on top.

Eagle Arms

  • Gomukasana Arms While standing with feet hip-distance, inhale the right arm next to the right ear, palm facing forwards, exhale and bend at the elbow so that the right palm slides down the back. The left arm stays by the left leg, bend at the left elbow, palm facing back behind you, and as much as you can bring the two hands to touch (use a towel or hold your t-shirt if need be.) Hold and breathe five breaths. Inhale release, and switch sides.

HIPS Often times while bouldering you will take a stance which requires really open inner-hips. The knee and toes will face away from the core as the front body is almost totally flush flat against the wall. The outer hips and glutes help push off from the legs to find the next hold. Warm up with these inner-hip openers:

  • Utthan Pristhasana/Lizard Pose Come to a low lunge with the front foot to the outside of both hands. Point the front foot and knee at a 45 degree angle, bend deep into the back hip, bringing it forward to get a stretch in the psoas. Hug the front knee in towards the front shoulder to get into the inner hip.To make the pose more intense, lower down onto your forearms, bent at the elbows. Hold for a few breaths and switch sides. To make the pose more intense, lower down onto your forearms, bent at the elbows.

Lizard

  • Utkata Konasna/Goddess Pose Stand with feet wider than hip-distance, knees and toes point out at a slight angle. Bend at the knees until you feel a good burn in your quads or glutes. Keep your torso upright, shoulders over hips, hold and breathe. Straighten knees and rest. Then go into again and place the hands on the top of the thighs. On an exhale, push into your right thigh with your right hand as you gently gaze over your left shoulder. Switch sides after holding five breaths. 

Goddess Pose

  • Malasana/Deep Squat Stay with your feet pointing out and knees following in the same direction just as you just did in goddess pose. Bend at the knees and allow your hips to sink towards the floor. If this isn’t possible for you, then lower only as low as is possible (meaning your bum might be in the air a bit.) Place your elbows inside your knees and press into them to open up the inner-hips. Palms come to prayer. Be aware of your spine and try to keep it erect as opposed to rounding. Stay and hold, straighten the legs to release.

Malasana

  • Kapotasona/Pigeon Prep Bring your right knee to your right wrist, right foot to left wrist. Left leg shoots straight back behind you on the floor. Stay upright with weight in your hands, or forward fold, being sure there is no pain in the right knee. Switch sides.

Pigeon

TOES Climbing shoes are small and sometimes pinch the toes together to enable more control in standing and pushing off of placements or juts of rock. Crimping toes together is very anti-yoga and doesn’t feel nice, so as soon as you pull your feet out of your climbing shoes I suggest giving the toes a big stretch. You can reach down and do this manually, sticking one of your fingers in between each toe and giving it a wiggle, or if you have the bodily awareness and control, you can simply find yogi toes.

Yogi Toes

Enjoy your climbing or boulder session with openness and awareness!